First Boot & Initial WiFi Setup
On first power-on (or after a factory reset), Venue Commander has no WiFi credentials. It automatically starts in Access Point (AP) mode so you can configure WiFi from any device with a browser.
What the display shows
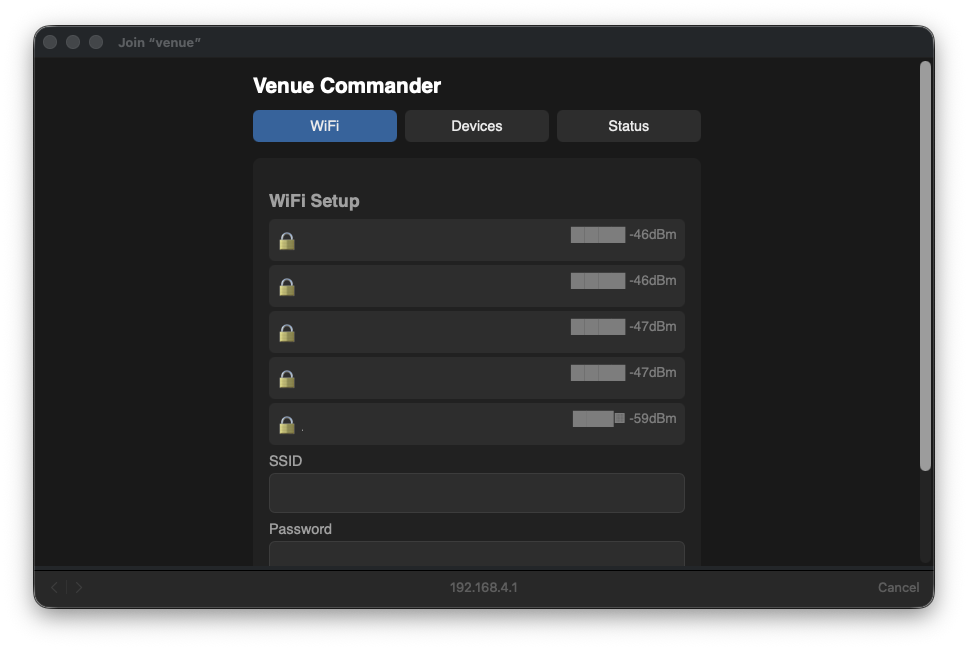
http://192.168.4.1/wifiThe touchscreen shows a setup page with:
- The device hostname / AP name (default:
venue) - Available WiFi networks from an automatic scan
- A form to enter SSID and password
Connecting to the setup network
- On your phone or laptop, look for an open WiFi network named venue (or the device's custom hostname if previously set).
- Connect to it. There is no password on the AP network.
- A captive portal should automatically open. If it doesn't, navigate to
http://192.168.4.1/wifiin your browser.
Configuring WiFi
- The portal shows the same WiFi setup page as the touchscreen. Select your target network from the scan results, or type the SSID manually.
- Enter the WiFi password.
- Click Save & Restart.
- The device reboots and attempts to connect to the specified network. If successful, the touchscreen shows the assigned IP address in the status bar.
If WiFi connection fails
If the device can't connect to the saved network (wrong password, out of range, etc.), it falls back to AP mode again after the timeout period. Reconnect to the AP network and try again.
http://venue.local if your network supports name lookups for local devices. If you've changed the hostname in the Device tab, replace venue with your new name (e.g. http://studio-a.local).Accessing the Web UI
Once your device is connected to WiFi (or Ethernet on the 7″ board), you can access the full web UI from any other device on the same network.
- Open a browser and go to
http://venue.local, orhttp://<device-ip>. The IP address is shown on the touchscreen status bar. If you've renamed the device, use the new hostname (e.g.http://studio-a.local). - If a web password has been configured, enter your credentials when prompted (username:
admin).
The web UI has these tabs: Status, WiFi, Devices, HA (Home Assistant connection + bindings), Layout, Theme, Gangs, Device (the touchscreen's own settings), Audio (when an audio board is attached), and Update.
venue123 with username admin. Change it before the device is on a network with anyone you don't trust.Tab Status
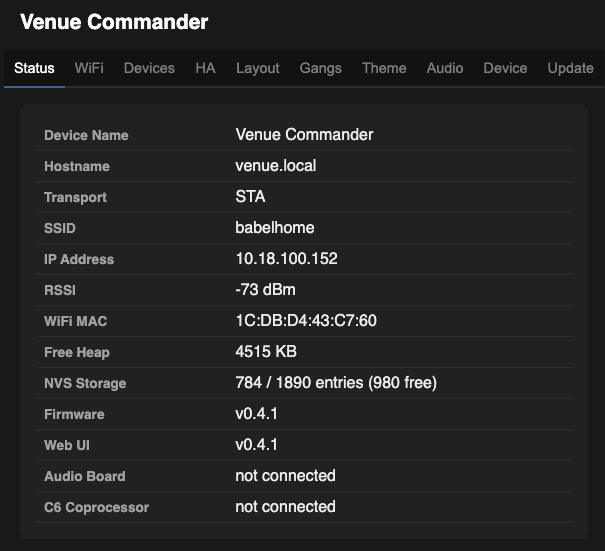
The Status tab is the landing page when you open the web UI. It provides:
Device Status
Connection info, IP address, firmware version, free memory, and endpoint health (OSC, Shelly, Home Assistant, and the optional audio board) at a glance.
Live Preview
A real-time screenshot of the touchscreen display, rendered as an image in your browser. Use the Refresh button to manually update, or tick Auto (2s) to auto-refresh every two seconds.
Quick Start: Setting Up From Scratch
Recommended order for configuring a new Venue Commander:
- WiFi — Connect the device to your network.
- Device — Set a display name and hostname, and change the default web password.
- Devices — Add your target devices. Pick OSC for mixing consoles (Wing, X32/M32), show control (QLab), or BT Esparagus. Pick Shelly for Shelly Gen2+ smart-home devices. Pick Home Assistant (configured on the dedicated HA tab) for any Home Assistant entity. Presets fill in the common defaults.
- Layout — Design your control surface. Each widget points at an endpoint by index. Widget presets are filtered by the selected endpoint's device type.
- Gangs — (Optional) Group multiple Shelly devices so they switch together. Add Gang Toggle widgets in the Layout tab.
- Page PIN Locks — (Optional) Lock engineer-only pages behind 4-digit PINs. Leave page 0 as your public “house” page.
- Theme — (Optional) Customise the display colours.
- Audio Board — (Optional) If you have the optional audio board attached, add audio widgets (BT volume, play/pause, now-playing, show mode, etc.).
- Save & Restart to apply everything.
Once configured, the touchscreen is ready to use as a remote control. Use the Status tab's Live Preview to verify your layout remotely at any time.