Tab WiFi
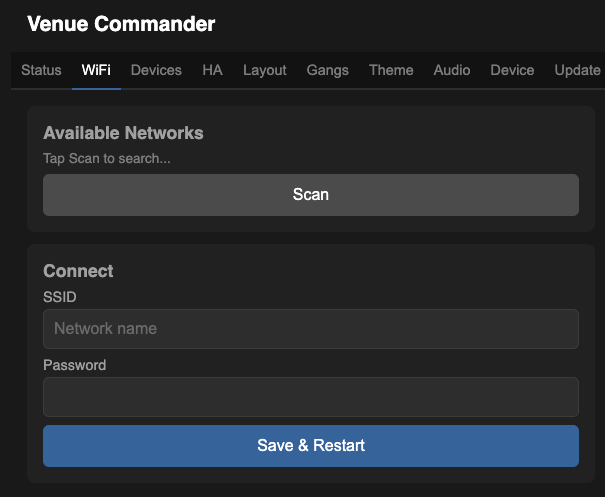
Available Networks
Tap Scan to search for nearby WiFi networks. Detected networks appear in a list — click one to auto-fill the SSID field below.
Connect
| SSID | The network name to connect to. Auto-filled from scan results, or type manually. |
| Password | The WiFi network password. |
Click Save & Restart to apply. The device restarts and attempts to join the specified network.
Tab Devices
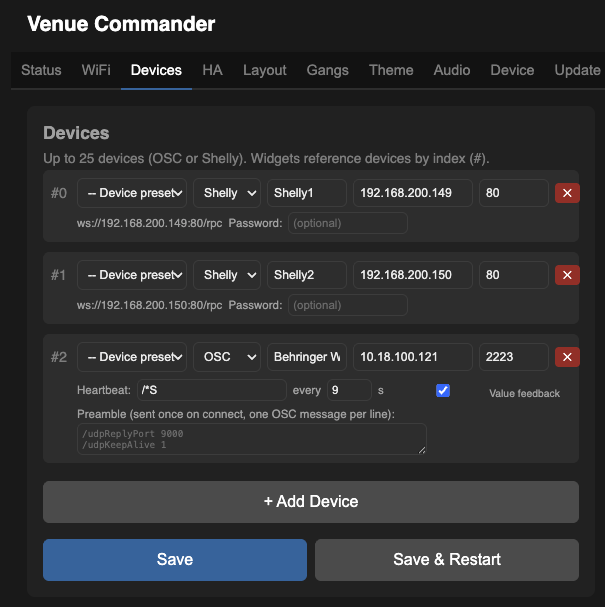
The OSC tab configures endpoint targets — up to 25 on the 4.3″ and 7″ boards or 8 on the WT32-SC01-Plus. Each endpoint can be one of three types:
- OSC — Any OSC-compatible device, with presets for popular ones (Behringer Wing, X32/M32, QLab, BT Esparagus) and a generic profile for the rest.
- Shelly — Shelly Gen2+ smart-home devices: switches, dimmers, covers, RGB lights.
- Home Assistant — Any entity on a Home Assistant install. Configured in a dedicated HA tab (one Home Assistant per touchscreen, shared by all HA endpoints); each endpoint binds one entity ID.
Each widget on your layout sends commands to one of these endpoints. Widgets reference endpoints by their slot number (#0, #1, …). The optional built-in audio board appears automatically when it's connected — you don't add it manually.
Adding a Device
Click + Add Device at the bottom of the list. A new card appears at the bottom — the same shape as the cards already in the list. Fill in the fields and click Save.
Common Fields
| Field | Description |
|---|---|
| Device Preset | Quick-fill from presets: QLab, Behringer Wing, XM32 (X32/M32), BT Esparagus, Shelly, or Generic OSC. Fills in the transport, port, heartbeat, and preamble with sensible defaults. Selecting a Shelly preset switches the transport to Shelly. |
| Transport | How the touchscreen talks to this device: OSC or Shelly. Different fields appear below depending on which you pick. |
| Label | A friendly name (e.g. “FOH Wing”, “QLab Mac”, “Living Room Lights”). |
| IP | The IP address of the target device. |
| Port | Network port. Common values: Wing = 2222, X32/M32 = 10023, QLab = 53000, Shelly = 80. |
OSC-Specific Fields
These fields appear when the transport is set to OSC:
| Field | Description |
|---|---|
| Heartbeat probe | An OSC address sent periodically to check if the device is still responding (e.g. /xinfo for Wing). Leave empty to disable. |
| Interval | How often to send the heartbeat, in seconds. |
| Value feedback | When enabled, the touchscreen listens for incoming OSC from this device and updates widget states (fader positions, toggle states) in real time. |
| PIN / Passcode | Optional authentication for devices that require it (e.g. QLab, BT Esparagus). The passcode is sent on connect and re-sent automatically if the device reports the session has expired. Devices with a PIN are given a more lenient liveness check to cope with the occasional dropped packet during Bluetooth audio streaming. |
| Preamble | Messages sent once when the device first responds. One message per line. Useful for telling the device which port to reply on, or subscribing to update notifications. |
Shelly-Specific Fields
These fields appear when the transport is set to Shelly:
| Field | Description |
|---|---|
| Password | The admin password for the Shelly device, if you've set one. Leave blank if the device doesn't require a password. |
State changes on the Shelly device (switch on/off, dimmer level, cover position) push back to widgets in real time — no need to refresh the page or poll.
Click the × button on a device card to remove it.
- Save — saves your changes without restarting.
- Save & Restart — saves and reboots so the changes take effect on the touchscreen.
Tab Home Assistant
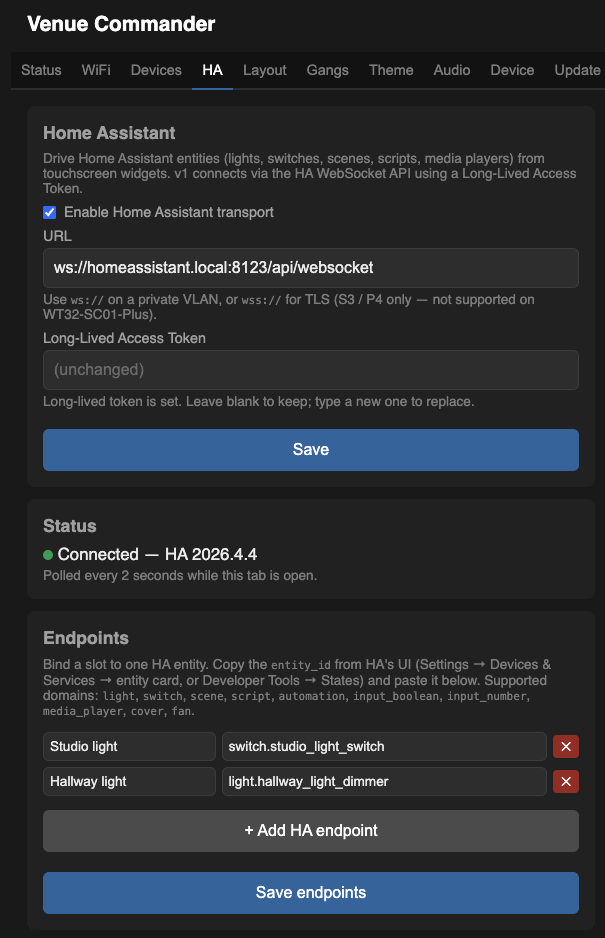
Home Assistant integration uses one persistent connection to your Home Assistant install to drive any entity from a touchscreen widget. Lights, switches, scenes, scripts, media players, covers, fans, automations — anything Home Assistant can address, Venue Commander can bind.
One Connection, Many Devices
Home Assistant setup has two layers:
- Connection — one Home Assistant URL and access token per touchscreen. Configured at the top of the HA tab.
- Per-device binding — each Home Assistant device on the touchscreen binds one entity ID (e.g.
light.living_room,media_player.kitchen_sonos). Home Assistant devices share the same 25 / 8 device limit as OSC and Shelly devices combined.
Setting Up the Connection
- In Home Assistant, open your user profile → Security → Long-Lived Access Tokens, and create a new token. Copy it — Home Assistant will not show it again.
- In Venue Commander, open the HA tab.
- Enter the URL: typically
ws://homeassistant.local:8123/api/websocket, orwss://…if you have HTTPS configured on Home Assistant. - Paste the Long-Lived Access Token.
- If you're using
wss://with a self-signed certificate (homelab setups), tick Skip TLS validation. - Tick Enabled and click Save. The connection-status indicator turns green when authentication succeeds.
Connection Fields
| Field | Description |
|---|---|
| Enabled | Brings the HA WebSocket task up. When off, all HA endpoints go grey and any HA widgets are disabled. |
| URL | Full WebSocket URL, including path. e.g. ws://homeassistant.local:8123/api/websocket or wss://ha.example.com/api/websocket. |
| Long-Lived Access Token | The token you created in Home Assistant. Stored on the device alongside your WiFi password. |
| Skip TLS validation | For wss:// connections to a Home Assistant install with a self-signed certificate (typical for homelab setups). Only available on the 4.3″ and 7″ boards — not supported on the WT32-SC01-Plus, where you'll need to use a plain ws:// URL on a trusted network. |
Binding an Entity
For each Home Assistant device:
- Click + Add HA Device.
- Give it a friendly Label (e.g. “Kitchen Sonos”).
- Paste the entity ID. The easiest way to find one is in Home Assistant itself: Settings → Devices & Services → Entities, or Developer Tools → States — copy the entity ID (e.g.
light.kitchen_table) and paste it in. - The device type (e.g.
light,switch,media_player) is taken from the entity ID and determines which widget presets are available. - Click Save.
Supported Domains (v1)
Widget presets are available for these HA domains:
light, switch, media_player, scene, script, automation, input_boolean, input_number, cover, fan.
Within each domain, widget addresses determine which service is called and which attribute is observed for feedback. Examples:
- light —
/state(Toggle / ToggleButton),/brightness(Fader 0–100 %) - media_player —
/volume(Fader),/mute(Toggle),/play,/pause,/play_pause,/next,/prev(Buttons) - cover —
/position(Fader),/stop(Button) - fan —
/percentage(Fader) - input_number —
/value(Fader) - scene, script, automation —
/activate(Button, stateless — flashes briefly on tap since HA emits no state echo)
Info widgets can also pull any attribute by name (e.g. media_title, current_temperature, current_position) — see the Widgets section.
Widget Liveness Border
Home Assistant widgets show a four-colour border indicating whether the target is reachable:
- Green — connected to Home Assistant and the entity is responding.
- Amber — connected, but Home Assistant reports the entity as
unavailableorunknown(Home Assistant can't reach the device). - Red — Home Assistant rejected the access token (it's wrong or has been revoked). Check the HA tab for details.
- Grey — not connected to Home Assistant.
Amber, red, and grey all dim the widget and disable touch — you can't drive a target you can't reach.
Tab Gangs
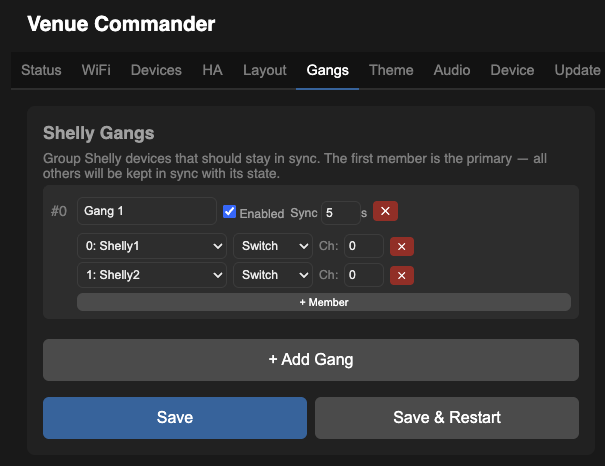
Gangs let you synchronise multiple Shelly devices so they act as one. When you toggle a gang on or off, every member device receives an explicit command simultaneously. A periodic sync tick keeps all members in agreement and detects when devices go offline.
How Gangs Work
- Primary device: The first member in the list (member 0) is the primary. All other members sync to match its state. Direct taps on a primary's per-device widget route through the gang, so all members stay in sync. Secondary members get
LV_STATE_DISABLEDon their per-device widgets to block direct control that would fight the sync. - Explicit commands: Gang controls send explicit on/off commands rather than “toggle” commands, so a missed command doesn't leave the group out of sync.
- Sync check: A configurable periodic check (default every 5 seconds) reads the state of each member. If anyone disagrees with the primary, a corrective command is sent automatically.
- Liveness: Each member is tracked as alive or dead. If a member doesn't respond within three sync intervals, it's marked dead. The status shows as a coloured border on gang widgets (green = all alive, amber = partial, grey = none).
- Settling time after a change: After a gang change, automatic checks on the affected devices pause for 2 seconds, so a stale reading can't overwrite the new state on the touchscreen.
Creating a Gang
- Go to the Gangs tab and click + Add Gang.
- Give the gang a name (e.g. “Living Room Lights”).
- Set the Sync interval in seconds (how often to check and correct member states). Lower values give faster sync but more network traffic.
- Click + Member to add Shelly devices. For each member, select the device (from your configured Shelly devices), the type (Switch or Light), and the channel (0 for single-channel devices, 0–3 for multi-channel).
- Click Save to apply immediately (no restart needed).
Gang Settings
| Field | Description |
|---|---|
| Name | A label for the gang, shown in the gang widget dropdown and on the touchscreen. |
| Enabled | When unchecked, the gang is inactive — no sync tick runs and no commands are sent. |
| Sync interval | How often (in seconds) to query member states and correct any disagreements. Default: 5 s. Range: 1–60 s. |
Gang Members
| Field | Description |
|---|---|
| Device | The Shelly device (from the Devices tab above) to include in this gang. Only Shelly devices can be in gangs. |
| Type | Switch or Light. Tells the gang what kind of Shelly device this is. |
| Channel | Which channel on the Shelly device this is (0–3). Use 0 for single-channel devices. Multi-channel devices (e.g. Shelly 2PM) use 0 and 1 for their two outputs. |
Using Gangs on the Touchscreen
After creating a gang, add a Gang Toggle or Gang Toggle Button widget in the Layout page. The widget controls all members of the gang with a single touch. The coloured border shows real-time liveness:
- Green — all members responding.
- Amber — some members offline (partial liveness).
- Grey — no members responding.
Limits
- Up to 8 gangs, each with up to 8 members.
- Gangs are global — they're not per-page. A gang widget on any page controls the same gang.
- A single Shelly device can be in multiple gangs (e.g. a hallway light in both a “Hallway” gang and an “All Lights” gang).
Page PIN Locks
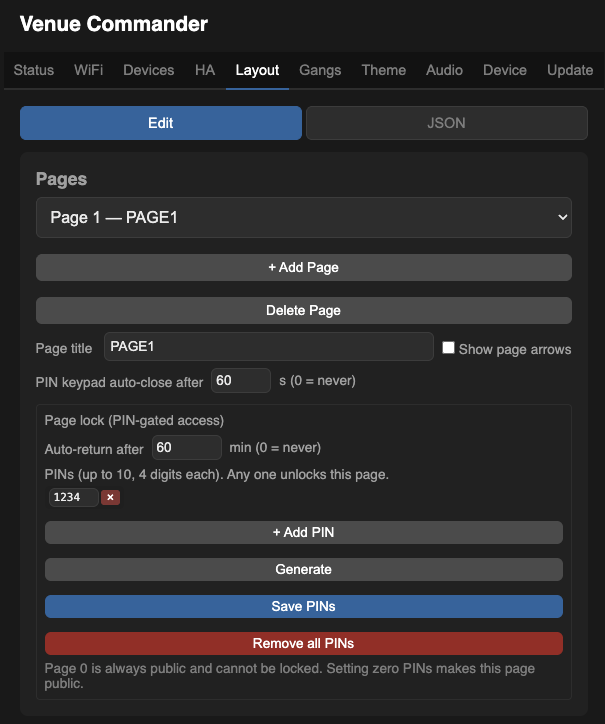
Pages 1–7 can be locked behind 4-digit PINs — useful for keeping “house” controls public on page 0 while restricting engineer/admin pages. Page 0 is always public and cannot be locked.
How PIN Locks Work
- Each lockable page can have up to 10 PINs — useful for giving different staff different codes, or for rotating PINs without breaking everyone's access at once.
- PINs are globally unique across all pages: typing a PIN on the keypad immediately unlocks whichever page it belongs to, regardless of which page you were on. (Same PIN can't be assigned to two pages.)
- The status bar shows a padlock glyph on locked pages. Tap it to bring up the keypad.
- The keypad auto-accepts on the 4th digit. No “OK” press needed.
- Auto-return to page 0 is wall-clock from unlock, not idle-based — so a class booking stays unlocked for its full duration regardless of how busy the engineer is.
- Keypad auto-close closes the modal if the user walks away mid-entry. Configurable globally in the Device tab — default 60 s, set to 0 to disable. Total time from open, not idle-based.
- The keypad modal is fully opaque, parented above all widgets, so the locked page is never visible behind it.
Configuring PINs
- Go to the Layout tab and select the page you want to lock (page 1–7).
- Find the Page PIN Lock sub-panel.
- Set the auto-return timeout in minutes — how long the page stays unlocked after a successful PIN. Set to 0 to disable auto-return (the page only re-locks on reboot or manual home).
- Add one or more 4-digit PINs. Optionally label each with a short note (e.g. “Stage manager”, “Touring engineer”) for your own records.
- Click Save Layout. PINs are saved immediately and take effect on the next page switch.